Update 2/1/2010: I’ve written a new post about my current workflow for geotagging photos based on information from my iPhone
While some cameras and camera phones have the ability to geotag digital photos as they’re taken, most still don’t. However you can still geotag your photographs accurately and automatically with the use of an external GPS enabled device like a cell phone, navigation device, or a dedicated GPS logger. Any device that can record a “GPS track” that can be transfered to your computer can be used to tag photos. And photos taken with any digital camera can be tagged in this manner.
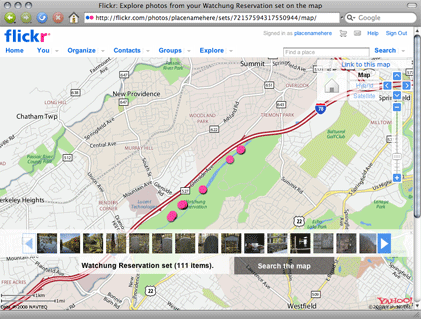
Here I’ll explain how I use GPSPhotoLinker on OS X to batch tag many photos from a day’s photo shoot with GPS tracks recorded on either a Sony GPS-CS1 or a Nokia N95 cell phone in order to create mapped photo galleries, like this one on Flickr.
Recording Tracks
The Sony GPS-CS1 is a device made specifically for logging GPS points for use in geotagging and attaches to your computer via USB. To start recording a track you just turn it on and to stop you turn it off. While its on it will record a log file containing points every 15seconds in a format called “NMEA sentences”.
The Nokia N95 is a higher end cell phone with built in GPS and the ability to install applications. The 3rd party location recording application I’ve found is called GPSed. Like the dedicated Sony device, while the application is running it records a log of points that can be transfered to your computer later via USB. Unfortunately, it writes logs are in a custom format that have to be uploaded to their web site and then exported into a variety of formats.
Other GPS devices like those from Garmin will work much the same way as described above — just follow the manual’s instructions on recording the tracks and downloading them to your computer.
There are many different geotagging applications on the market here are a few for OS X compared but I’ve settled on using GPSPhotoLinker because I don’t need some of the extra features like tagging via drag+drop or looking at images on maps. My desire is simply to sync the geo data with the photos and then get on with the rest of my workflow.
Converting tracks for use with GPSPhotoLinker
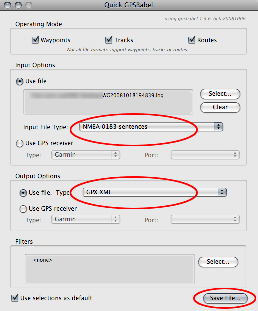
GPSPhotoLinker is great application, but its main limitation is that it only reads GPS tracks in 2 standard formats: GPX or TCX, which means that you may often have to convert the output of your GPS logger into something that it can read. For the tracks recorded with GPSed I can just download the exported tracks in this format, but for the Sony tracks in NMEA sentence format I’ll need another free application: GPSBabel and its companion GUI, GPSBabel+.
GPSBabel+ can be used to quickly convert from a large variety of different geo data formats into GPX files that can be loaded into GPSPhotoLinker.
Batch updating photo EXIF & IPTC metadata
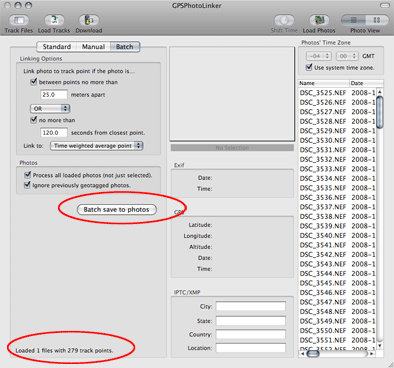
Once the images are on the computer and the GPS tracks are in GPX format both can be loaded into GPSPhotoLinker where all images can be updated at once with its batch processing tools. The settings I use to update the photos can be see in the following screenshot.
What next?
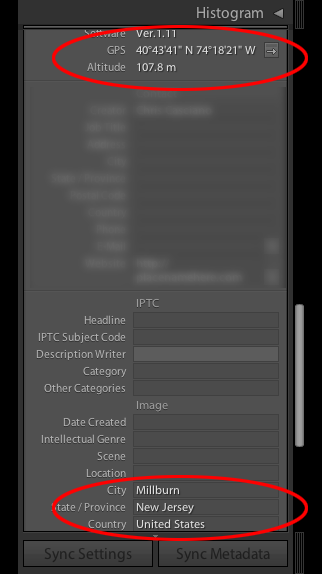
After the individual photos are tagged I then work with them as I would any other photo. I import them into Adobe Photoshop Lightroom where I add text based tags, adjust colors and other image settings, ultimately choosing some for upload to Flickr or printing service. No additional intervention is needed to ‘use’ the results of the image tagging process — the metadata is visible in Lightroom where I can click it and see a google map location, and images uploaded to Flickr with this geodata are automatically placed on the map for me.

Quick Workflow Recap
- Download photos and GPS tracks to my computer
- Convert GPS tracks to .gpx with GPSBabel+
- Load photos and .gpx file into GPSPhotoLinker and batch process them
- Import photos into Adobe Photoshop Lightroom, or similar application and get on with the image processing
Some additional notes and hints
- Be sure to keep GPS device and camera time settings in sync.
- I’ve found its best to pause your movement for a moment and check that the tracking device has a signal when shooting for most accurate results.
- GPSPhotoLinker updates IPTC fields with location data it receives from terraserver-usa.com, unfortunately I have found this information to be quite flaky, particularly when in an area that cannot be tied to a specific municipality [resulting in often occurrences of NJ locations written as being in NY]


Comments Temporarily(?) Removed