Computers are built to perform repetitive & tedious tasks. But as users of the computers we’re never exposed to all the tools that are provided to help, and when we are the balance between familiarizing ourselves the given tool and learning to make it do what we need it to do is a larger endever then just doing the thing manually once or twice a day.
Along these lines Apple has long had the ability to script application and operating system tasks via the AppleScript language — powerful, but not the easiest thing to pick up. However, since OS X 10.4 Apple has shipped a free visual workflow tool called Automator that can do some quite powerful things with just a few clicks or drags of a mouse. Creating complex workflows via Automator still has a learning curve and takes some trial and error, but to get it to do some simple things is easy, will take you 5 minutes, and save you time every day.
60 Second Automator Overview
Automator is a visual macro tool that allows you to string together a series actions associated with single tasks in applications like Finder, Keynote, iPhoto, Transmit & Photoshop and create workflows that you can run via the Finder, Services Menu, standalone Application [Droplet] or iCal event item. Each action takes some input [text, URL, selected files], performs a task and then passes the output onto the next item you’ve placed in the chain.
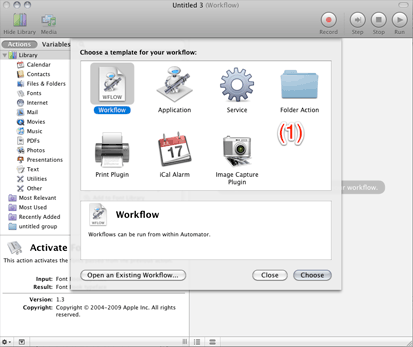
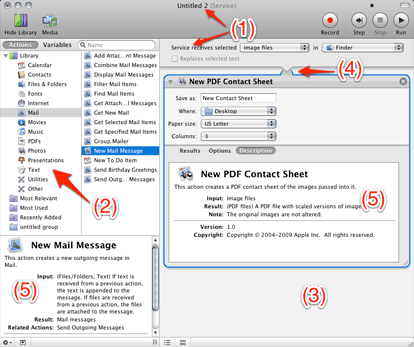
To create a task in Automator for Snow Leopard you first pick the type of workflow you want to build [1], then select different actions from the Library on the left [2], dragging them into the workflow area [3] on the right as you go. Each action can then be dragged up and down in the workflow area and you are able to set options. You’ll note actions can be connected [4] which means the output of an action is passed to the next . An action description, input types and output types are all listed in the action description areas [5].
MacOSXAutomation.com has some useful introductory videos if you want to learn a bit more.
There are many actions that ship with OS X, but you will also find actions that ship with 3rd party apps like the FTP app Transmit or the RSS reader NetNewsWire, and in some cases, like for Adobe Photoshop, other users have built actions for you.
3 Easy Sample Automator Tools
Here are 3 different examples of tools that routinely save me 2 clicks here or 8 clicks there and took almost no time or investment into learning Automator to create.
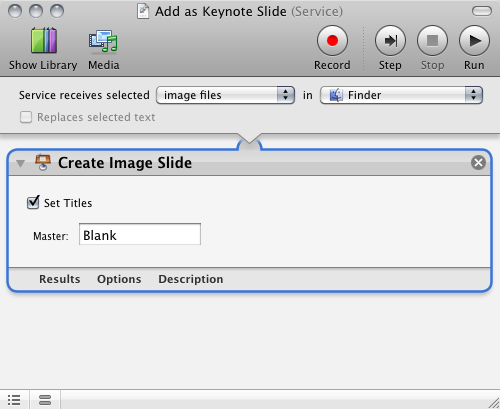
Add as Keynote Slide
This single action service allows me to right click on an image file in Finder and add to a new “Blank” slide at the end of the Keynote presentation I’m currently working on.
Resize Image for Mail (or Web)
Whether you’re working with photos or web page designs or other image samples you have probably needed to scale down the resolution of an image so it’s not too large to send in an email or post on the web to Facebook or a discussion forum. This little service makes a copy of the selected image files then resizes the duplicate.
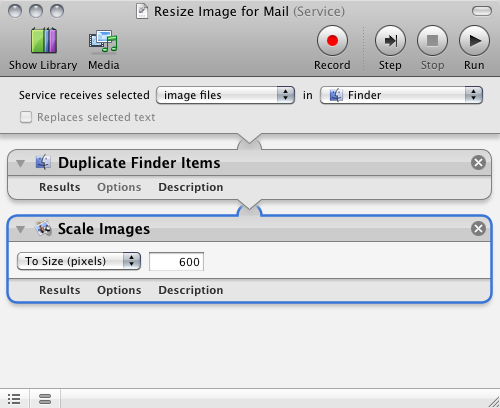
Adding the “Add Attachments to Front Message” action at the end of this process will take things even further and automatically add the resized image to the email you’re composing.
Send to FTP Site Folder Action
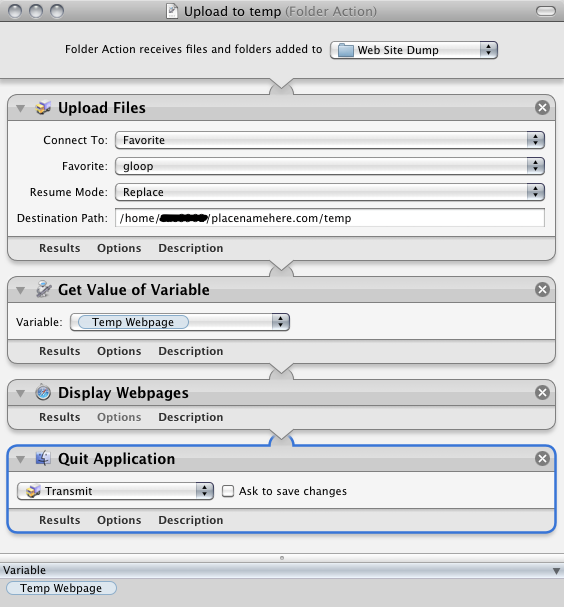
I have a temp folder on my web server for placing files to pass to clients or to quickly share with friends. Using the Actions that ship with Transmit this Folder Action automatically uploads a copy of the items placed in the folder to my site and then launches a specified web page [using a variable] so that I can grab the link to the newly uploaded file.
For More Automator Information
This is just the tip of the iceberg of what can be done with Automator, but the tip as a great effort to payback ratio. Without getting into scripting or much more complex tasks you can search Apple’s download site or elsewhere the web for 3rd party actions for your favorite apps or combine other automation tools that you already know like Adobe Photoshop Droplets with Automator workflows to see more benefits from automation. Here are a few more sites and articles to dig into:
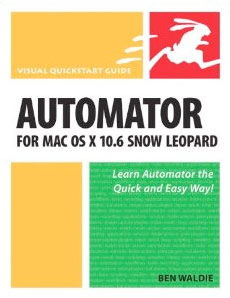
- Automator for Mac OS X 10.6 Snow Leopard: Visual QuickStart Guide by Ben Waldie at Amazon.com
- MacOSXAutomation.com has some basic video and written tutorials
- Apple’s Automator Actions Download Site
- Peachpit Blog’s “Five Automator Services Tips in Five Days” by Ben Waldie: Day 1, Day 2, Day 3, Day 4, Day 5
- How To Create Your Own Services Menu Options on Mac by Bakari Chavanu
Download Sample Services
You can download and install the first 2 sample Automator services described above. To install the services, unzip the archive then copy the two files into the ~/Library/Services folder. The services will then be available when you right click an image file in Finder.
Comments Temporarily(?) Removed